

Making Kombucha at Home
I first learned about Kombucha while in Chiropractic school. I had no idea what it was or why everyone was drinking it, but boy did I change that fast! I fell in love with kombucha the second I started learning about the health benefits of it…the taste on the other hand, I had to warm up to. I’ve never been much of a tart/sour flavor kind of girl and I’ve never liked any kind of tea (yes, I am from the south, but sweet tea is not my thing!), so like I said, it was a flavor I had to grow to love! But drinking kombucha every day can really get expensive! So I started looking into making my own and have been doing it ever since!
What is Kombucha?
Kombucha starts out as essentially sweet team, which is then fermented with the help of a scoby. “SCOBY” is actually an acronym for “symbiotic culture of bacteria and yeast.” But it is the goodness and bacteria that we need to help populate our gut and to boost our immune system. When you buy apple cider vinegar with “the mother” (which you always should!) it is essentially the same thing. The scoby bacteria and yeast will then eat most of the sugar in the tea, transforming the tea into a fizzy, slightly tart fermented (but mostly non-alcoholic) beverage that is relatively low in calories and sugar.
Let’s talk about the SCOBY
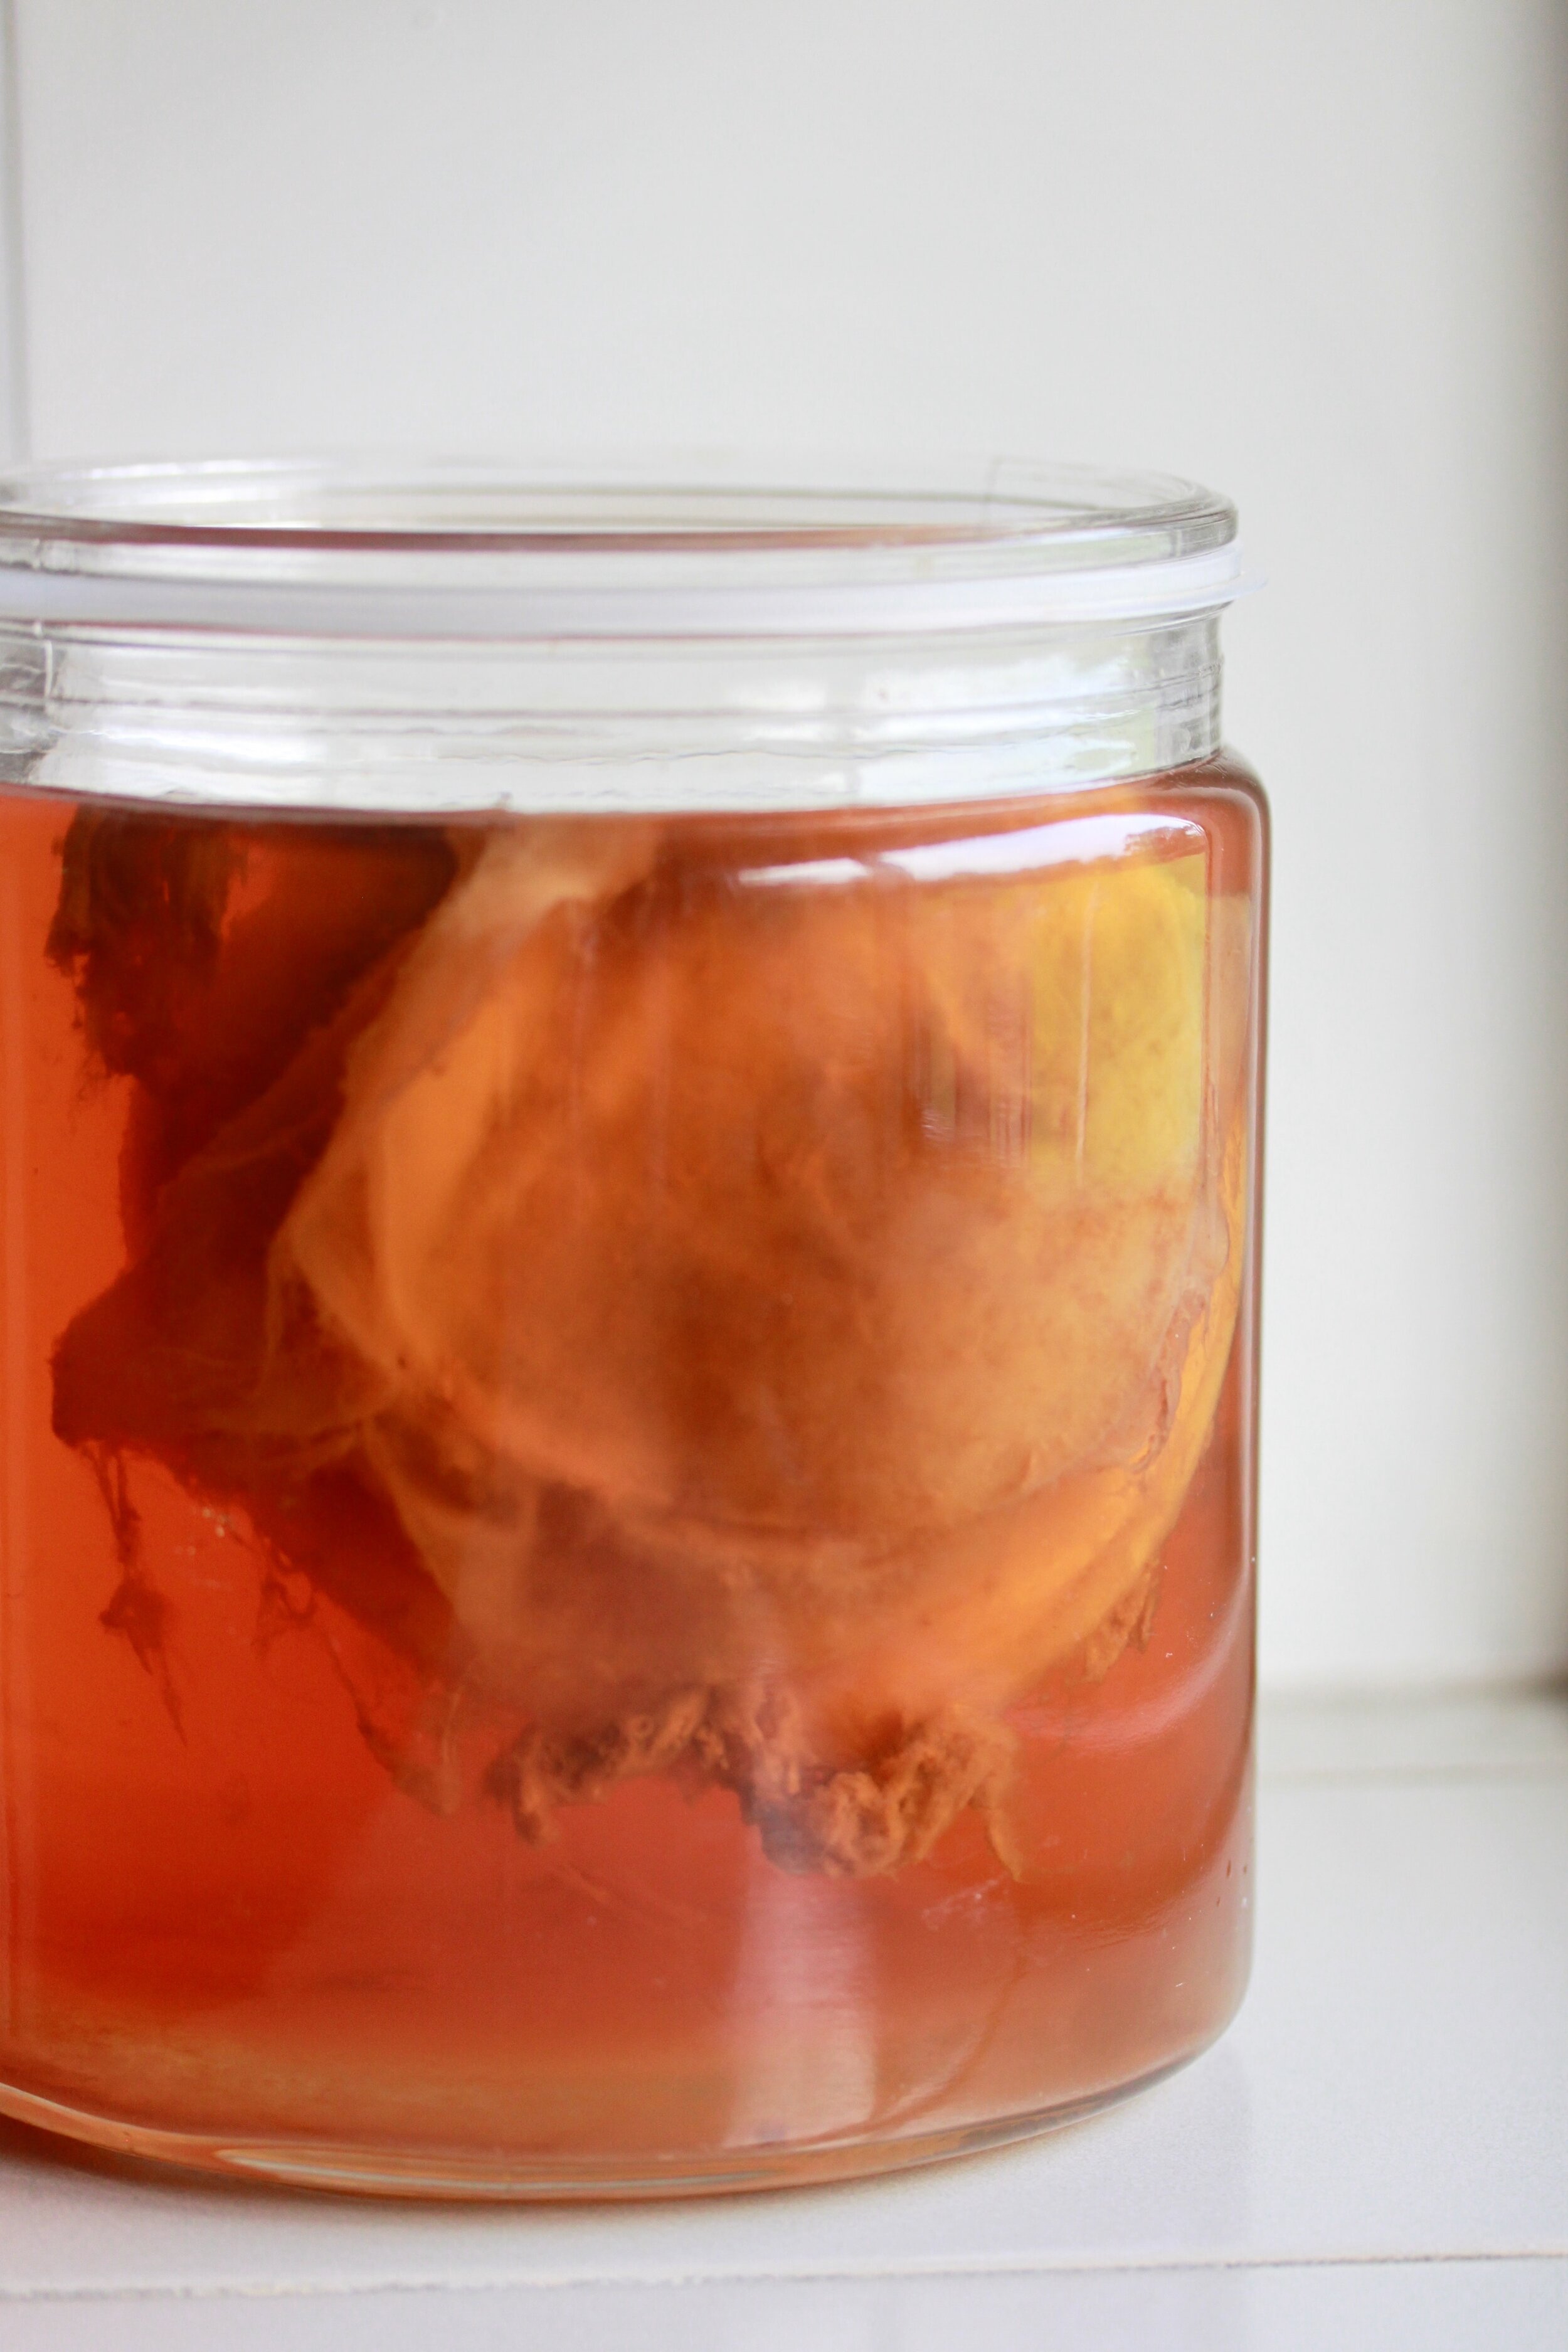
For most people, the scoby is the weirdest part of making kombucha at home. When I first met my now husband, he thought I was doing some weird science experiments in my kitchen!
As you can see from the picture on the right, it’s kinda weird. Most of the time it floats at the top, randomly can sink to the bottom, can even come out of the liquid a bit, it’s gooey and slippery and looks like a slimy pancake (have I convinced you how awesome it is yet?!). It can also have brown wispy things coming off of it, but all of this is normal! And really cool when you look into the purpose.
There are a lot of theories about why the bacteria and yeast form this jelly-like layer colony at the top of the kombucha. One of my favorite reasoning is because it’s protecting the good bacteria from the bad bacteria in the outside world. How cool is that?! So now let’s talk about why that good bacteria is so good for us.
I will do another post on making a SCOBY at home, but for now, if you’re looking to make your own kombucha at home and need a scoby, send me a message! I tend to have extras at home!
Kombucha is full of probiotics!
Probiotics are essential for proper gut health. Especially if you or anyone in your family has even been on antiobiotics! When we take antibiotics, it kill the majority of the bacteria in our gut - both bad bacteria and good bacteria. So things like kombucha and yogurt and kefir are essential in helping to repopulate the gut bacteria that is essential for immune function and proper food digestion and absorption.

Now let’s get to the fun stuff…
Making Kombucha at Home
My favorite recipe that I have used all this time, comes from our friends at Kitchn (shared below). This recipe will make about a gallon. I tend to make two batches at a time so that I don’t have to make it as often!
Ingredients
3 1/2 quarts water
1 cup raw cane sugar
8 bags black tea or green tea (you can use flavored teas as well, but then the scoby will have those flavors still for your next batch if you’re trying something else. It’s easier to wait and add flavor at the end)
2 cups starter tea from last batch of kombucha or store-bought kombucha (unpasteurized, neutral flavored)
1 scoby per fermentation jar: homemade, bought locally or online
Things You’ll Need
Stock pot
1-gallon glass jar or two 2-quart glass jars (here’s a great Amazon option!)
Tightly woven cloth, coffee filters, or paper towels, to cover the jar - my favorite are these flour sack towels that I use to dry dishes in my kitchen anyways! I just cut one up to put over my jars.
Rubber band to keep your cloth in place
Bottles: Six 16-oz glass bottles, swing-top bottles, clean soda bottles, or just a growler jug if you aren’t needing to take your kombucha on-the-go!
Small funnel
Here’s How to Make It!
Make the tea base: Bring the water to a boil. Remove from heat and stir in the sugar to dissolve. Add in the tea bags and allow it to steep until the water has cooled. Depending on the size of your pot, this will take a few hours. You can speed up the cooling process by only using half the water to make the base and then adding the other half of chilled water.
Add the starter tea: Once the tea is cool (<85 degrees F), remove the tea bags or strain out the loose tea. Stir in the starter tea. The starter tea makes the liquid acidic, which prevents bad bacteria from creeping in during the first few days of fermentation.
Transfer to your jars and add SCOBY: Pour the mixture into a 1-gallon glass jar. With very clean hands, gently slide the scoby in the jar. Cover the mouth of the jar with your cloth of choice and be sure to secure with a rubber band. This keeps any fruit flies out that like the smell of your new brew!
Ferment for 7 to 10 days: Keep the jar at room temperature, out of direct sunlight, and where it won't get moved a round a bunch. Ferment for 7 to 10 days, checking the kombucha and the scoby periodically. I tend to even lead towards the 14 day mark if you like it a little more tart!
The fun part - tasting! After about 7 days, you can begin tasting the kombucha daily by pouring a little out of the jar and into a cup. When it reaches a balance of sweetness and tartness that is pleasant to you, the kombucha is ready to go!
Remove the scoby: With clean hands, gently lift the scoby out of the kombucha and set it on a clean plate. If you’re wanting to make another batch, the scoby can go right in to your new tea mixture! If you want to store for later, you need a bottle with some starter tea for your scoby to live in.
Bottle the finished kombucha: Measure out your starter tea from this batch of kombucha and set it aside for the next batch. Pour the fermented kombucha (straining, if desired) into bottles using the small funnel, along with any juice, herbs, or fruit you may want to use as flavoring. Leave about a half inch at the top.
Carbonating: Store the bottled kombucha at room temperature out of direct sunlight and allow 1 to 3 days for the kombucha to carbonate. Refrigerate to stop fermentation and carbonation. This batch of kombucha is good for about a month, but if you’re like me, it’ll be gone way before then!
Make a fresh batch of kombucha: Clean the jar being used for kombucha fermentation. Combine the starter tea from your last batch of kombucha with the fresh batch of sugary tea, and pour it into the fermentation jar. Slide the scoby on top, cover, and ferment for 7 to 10 days.
Additional Notes
Note: Avoid prolonged contact between the kombucha and metal both during and after brewing. This can affect the flavor of your kombucha and weaken the scoby over time.
During fermentation. it's not unusual for the scoby to float all around the jar. A new cream-colored layer of scoby should start forming on the surface of the kombucha within a few days. It usually attaches to the old scoby, but it's ok if they separate. You may also see brown stringy bits floating beneath the scoby, sediment collecting at the bottom, and bubbles collecting around the scoby. This is all normal and signs of healthy fermentation.
Have you made your own kombucha at home?! Let us know your tips and tricks and favorite recipes below!